Visual Studio 2017 and ASP.NET Core MVC
14 December 202107 April 2017 | Software | Technologies
This article was written by Irina, one of our senior .NET software developers currently working with Visual Studio 2017 and ASP.NET Core. To learn more about our .NET development know-how and offering, see our Custom .NET Development Services.
If Visual Studio 2015 doesn’t meet your needs anymore, you should give Visual Studio 2017 a try. The updates to the CLI Tools, the new templates, changes in existing templates and the framework, Docker integration and a lot of other cool stuff will most likely make you happy.
Visual Studio 2017
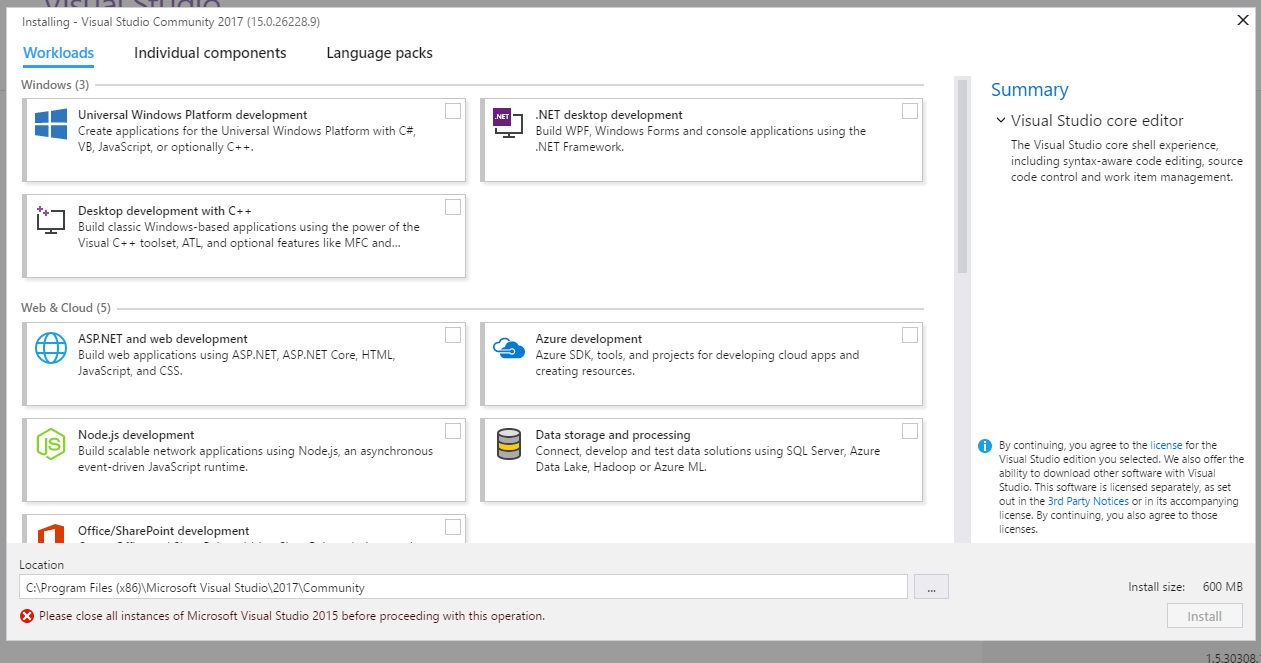
From the beginning of the install phase, we can notice how Microsoft surprises us with a performance optimized IDE. The installer is workload-based, allowing package installation for a certain kind of application development. In addition, it doesn’t come with any bloatware (assemblies or SDKs) that you won’t ever use for that kind of development.
Comparing with VS2015, which takes “just” below 1 hour to install around 8 GB, ASP.NET with 2 workloads (Web Development and Net cross-platform) takes around 10 minutes for the first install for 4.79 GB installed. So… you can feel and see the difference.
To compare, the startup time is 2.58 seconds for VS17, and 7.65 seconds for VS2015.
What’s new in Visual Studio 2017?
1. Support for JavaScript debugging
Lately, Microsoft has been more and more interested in integrating tools that are used mostly in front-end development. This feature, needed by some of us in different development phases, is provided by Visual Studio 2017. From this moment on, if you write either C# code or JavaScript, the debugging is done in the same way: you have the Locals window populated and you can add watches on variables. So, whether you are a front-end or a back-end developer, you can have pretty much the same coding/debugging experience with VS2017 and with the previous version of VS.2.
2. Docker container support
Docker can be added in the project when you start from scratch, or at any moment in the development cycle.
3. Roaming extensions manager
Any VS2017 extension will be installed in the Roaming Extension Manager and saved in the cloud. Therefore, when switching computers after login in Visual Studio, all the extensions will be there, so you won’t lose any precious time reinstalling them or remembering what extensions you were using.
4. Live unit testing
The live unit testing feature displays unit test results and code coverage live in the editor, so you’ll see very soon if you break a test while you’re coding.
5. Quick actions and refactoring tools
With quick actions and refactoring tools, refactoring is easier, since by default we have a preview of the end results. We will also get suggestions from the IDE on what improvements we can do to increase code clarity (for example, Use null-coalescing operator, Move out variable declarations inline).
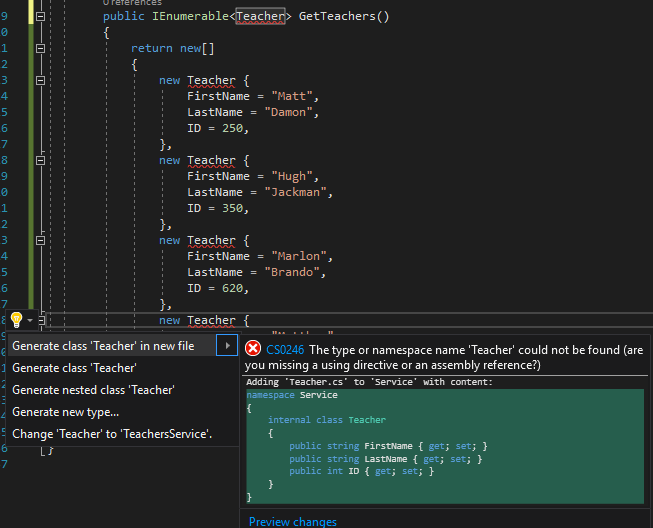
Another great feature that Visual Studio provides to increase productivity is the generation of new types on the fly, for which it also gives you a preview:
6. GoTo Menu
We have a new submenu under Edit, which mimics the search functionality from the ReSharper tool. This has a “fuzzy” matching which ensures that search results will still be shown in case of misspelled words.
7. Coding Convention Configuration and Enforcement
This functionality allows you to configure coding style conventions per project for your team. You can define these conventions, add them into source control and the IDE will show on the fly any violations that happen when developers type without paying attention to them. This way the entire team will be in sync and apply the same standards.
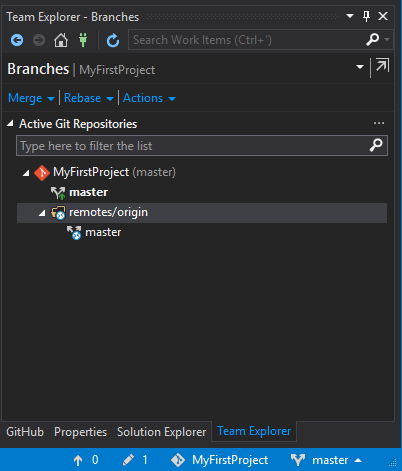
8. Git features
Most of the tasks that we performing with Git (such as comparing commits, push, rebase) can be done inside Visual Studio without leaving the IDE.
ASP .NET Core MVC
As you probably already know, in ASP Core 1.0, Microsoft introduced a new file named project.json that was meant to replace the good old csproj file for references and dependencies. Everybody was happy about having a json file with autocomplete and getting rid of csproj once and for all.
It was nice, until it wasn’t available anymore. Microsoft gave up project.json when they realized that not many developers will migrate their projects to ASP Core since it’s not supported by MSBuild.
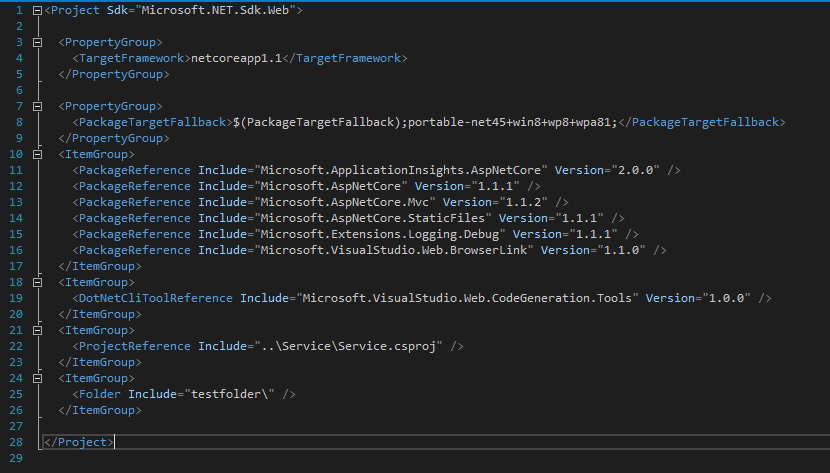
Revised csproj
ASP.NET Core MVC brings a csproj file on steroids, which supports wildcards and every file added in the project folder will automatically show up in Solution Explorer. This is great for source control and resolving conflicts.
There is no need to list each and every file in the project just to make sure Visual Studio knows that those files belong to a certain project. This is true to a certain level. For example, if you open a solution in File Explorer and add a folder, to see it in Solution Explorer you need to click “Show all files” and the greyed-out folder you just added will show up, but it won’t be part of the solution. You’ll still need to include it in the project, as you used to do with all the files up until VS2017. A json file or an image will appear in Solution Explorer as soon as it is added to the folder.
We now have a human readable file without GUIDs that keeps track only of the packages, their versions and the folders added. Furthermore, we can edit it directly without unloading the project (time saving, isn’t it?).
Another useful feature is that we can have multiple target frameworks in one project.
Packages and References
.NET Core MVC projects have a different structure, even if it follows the same Convention over Configuration approach. I can say that now it has a higher degree of flexibility. Everything that the project uses is kept under the Dependencies container umbrella.
This separates them in sub-containers based on their source, providing us with a clear separation of Assemblies, NuGet packages, references, SDKs or UI-related frameworks installed with Bower.
If you wonder if you should know exactly under which node to add a certain reference the answer is that you don’t need to know and you shouldn’t care. Just right-click the Dependencies node -> Add Reference, and Visual Studio takes care of everything else: it adds a new sub-container for your reference or just adds your reference under an existing one. Either way, the new approach on references and dependencies gives us a way of knowing in an instant what libraries and versions we have in the project.
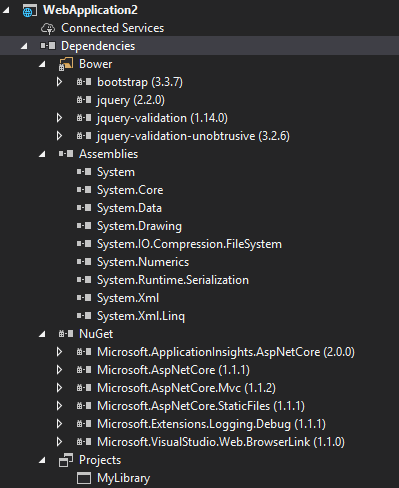
Package References are integrated into the revised csproj file. We won’t find any packages.config files in any of the new projects since all the server-side packages installed will show up as PackageReference nodes in our csproj file.
View Components
Basically, to have a view component you need a view and a class that has logic for that view, or simply consumes and returns data for that view.
To be recognized as a View Component, this class needs to have one the following 3 special features:
- extends ViewComponent class
- Is decorated with [ViewComponent] attribute, or it derives from a class with [ViewComponent] attribute
- Has a name that ends in “ViewComponent” suffix.
If you want to be thorough, you can add them all (or just stick to the Convention over Configuration approach that ASP MVC relies on).
This class needs to be public, non-abstract and non-generic, following the same principles as Controllers do.
You can place your components anywhere in the project but the recommendation is to create a folder named ViewComponents to follow the same principles you use for Models, Controllers and Views.
Search location for ViewComponents view
ASP will search under the following paths to find views:
- “Views/ControllerFolder/Components/ComponentNameWithoutSuffix/Default.cshtml
- “Views/Shared/Components/ ComponentNameWithoutSuffix/Default.cshtml
By default, it requires to have Default.cshtml, but if you want to use another name you need to specify it as a first parameter when returning the View from ViewComponent class, just as you used to do when you returned a different View from an action in Controllers.
The main purpose of these components is to provide a way of creating reusable components that don’t depend on a model or a controller with all the logic that you need, dependency injection and separation of concerns. In other words, they are a mixture between a partial view and a child action, that can be rendered async or sync.
View Component = ChildAction/Partial View + Separation of Concern + Dependency Injection + Async
Beware, sections don’t work within View Components, so if you decide to include JavaScript or CSS in your component you should keep in mind that their main scope was to provide a way of reusing dynamic components, independent of a context.
Are there cases when I shouldn’t use a view component?
Yes, there are. Just stick to the normal PartialView usage if your component doesn’t have an appreciable amount of logic or it can be bound to a model and a controller. You always need to keep in mind the complexity amount you add when choosing a solution over another.
How to use it in code
The ViewComponent class is named StudentsViewComponent and we have two ways of calling it async from another view:
@await Component.InvokeAsync<MyFirstProject.ViewComponents.StudentsViewComponent>())
Or
@await Component.InvokeAsync("Students")Of course, we shouldn’t forget that we can give parameters to the view component class if needed.
Dependency Injection in Views
There are a few cases where you just need to populate View elements such as checkboxes, dropdowns or chained dropdowns. To bring the necessary data into the View you either used ViewBags or you created a HtmlHelper to aid you. No matter how, I’m pretty sure you got through a few layers to add your data.
Now you have a way of injecting services directly in Views without passing through a controller:
@using Service;
@inject  CitiesService CitiesServices

<div>
    Available cities: @Html.DropDownList("Cities",
        CitiesServices.GetCities().Select(g =>
                 new SelectListItem() { Text = g.Name, Value = g.ID.ToString() }))
</div>
Conclusion
Microsoft’s partnership with RedGate came exactly when organizations are interested in extending their DevOps practices to SQL Server and Azure SQL databases. With ReadyRoll Core you can develop and automate deployments of the database and compare the changes, SQL Prompt Core offers code completion for SQL as you type, while SQL Search provides you with search and explore functionality for any database, directly in Visual Studio, shaping a promising future for full-stack .NET developers.
Furthermore, rethinking the .NET framework as a whole (creating .NET Standards, buying Xamarin and creating .NET Core) made the framework more appealing than before, encouraging programmers to get involved in more .NET projects.
Even though what Microsoft has been releasing lately cannot be considered largely innovative and sometimes their products are not 100% stable from the beginning, I feel that good things are about to happen for the .NET enthusiasts out there.
About the Author

Irina


