Enabling Continuous Integration
23 January 202421 August 2018 | Software
Developers and businesses want to move faster and to add more value to their products in a safe manner. Continuous Integration is part of a set of practices that allows them to do that. Learn from this article the fundamentals of Continuous Integration and how you can apply it to your projects.
What is Continuous Integration?
Continuous Integration is a software development practice that allows teams to move faster by shortening the time it takes to receive feedback on the changes they’ve made to the codebase. It became a popular practice in the industry during the early days of the Agile Manifesto and it is one of the core practices of Extreme Programming.
Continuous Integration assumes a single repository (most of the times with one main branch and short-lived feature branches) in which changes to the codebase should be checked-in several times a day (merged from the short-lived feature branches into the main branch). Every check-in should pass a set of fully automated verifications that check if:
- The software compiles and builds
- All the tests pass (at the check-in point we’re usually running just the unit tests, we’ll cover this in more details later in the article)
- No compiler warnings/code styling warnings have been introduced.
These verifications include any other verifications/reports that are relevant for the project under consideration, such as:
- The size of the binary
- The added metadata, such as permissions/entitlements
Given the assumption that developers check-in several times per day, it is mandatory that all of these verifications run fast, usually no more than five minutes. Otherwise, the development team will avoid checking in as often as they should and will run into integration issues.
The verifications above are usually ran by a Continuous Integration server (e.g. Jenkins, VSTS, CircleCI etc.) that monitors the changes to the repository and triggers these verifications. When all these verifications are successful, the changes are merged from the short-lived feature branch in the main branch.
The feedback loop is thus shortened because all the verifications are fully automated and run several times per day.
If these verifications fail, the developer’s top priority task is to fix them, especially if the changes were checked-in directly in the main branch. When these verifications are successful, the Continuous Integration server should make the binaries available to everyone and allow either manual or Continuous Deployment to the desired environment.
How to Enable Continuous Integration?
Let’s take the steps above and see how we can apply them into practice.
Before doing that it’s really important to mention that all the automated verifications should be done via automated scripts (PowerShell, bash, Rake, Cake, Gradle etc.) and not via the form-based tasks that each Continuous Integration server provides. This minimizes the coupling to a specific Continuous Integration server and allows us to perform the same verifications on the local machine. The automated scripts should be first class citizens in your codebase and you should apply the same clean code practices when you write them as you do to your production and test code.
Short-Lived Branches and Multiple Check-ins Per Day
The main purpose of short-lived branches is to avoid integration issues (such as merge conflicts or interface changes) and to shorten the feedback loop, especially from a code review perspective (small changes are easier to review and to address than big changes).
This can be achieved first through a good breakdown of the user stories. The user stories should follow the INVEST model (Independent, Negotiable, Valuable, Estimable, Small and Testable). Of course, not even with a good user story breakdown, guarantees that a story can be implemented in a single day, but such a breakdown can guide us into identifying the smallest functionality that adds value to the user.
The user story can be broken in several technical tasks that can be checked in gradually by using feature flags to disable the feature until all the technical tasks have been completed (and maybe even after that, as you might want to enable it only for specific users, via a gradual release).
The Software Compiles and Builds
This is probably the most important verification. No one in the team wants to check out the latest version of the code and find out that it doesn’t even build.
Most of the software development technologies come with a complete command line toolchain that allows the development team to compile and build the software without the need of IDE or GUI. Examples of these tools include MSBuild, xcodebuild, Gradle, Maven, Ant etc.
All Tests Pass
This is probably the second most important verification (I say probably because some might even consider it the first – since you can’t run the tests if the software doesn’t build). A comprehensive suite of automated tests significantly reduces the feedback loop, which is high in the traditional manual testing approach and allows us to move faster with more confidence.
There are however different types of tests and usually, not all of them are run at the check-in level. As mentioned earlier, the automated verifications at the check-in level should run fast because they run in the memory and don’t cross any physical boundaries (they don’t hit the database or the network), making them self-contained and less brittle. This is why usually at the check-in level we run just the unit tests.
Along with the execution of the unit tests, companies usually enforce a certain value for the code coverage provided by the unit tests. Unfortunately, by code coverage, most of the tools indicate code execution which doesn’t correlate with having the right assertions in your tests and having a high-quality suite of unit tests. There are a few helpful mutation testing tools out there that would help in providing real code coverage, or, if you are doing Test Driven Development you’re going to have real high code coverage since every line of production code was written to make a test pass.
We prefer to run the other types of tests, such as integration and acceptance testing, periodically (e.g. nightly) or after the check-in level verifications have passed. This is because they take up to several hours to run. Of course, you’d want to run outside the check-in level other automated tests besides the functional ones, such as security, performance or load tests. Since these tests require the integration of some of the components or of the whole system, they should run in an environment that clones within reason the production environment from a configuration perspective, making the test results even more relevant.
Even if not all the tests are run at the check-in level, we would still want to know that all of our automated tests passed before deciding if the product is releasable.
No Compiler Warnings/Code Styling Warnings Have Been Introduced
Compiler warnings provide helpful information such as the depreciation of certain APIs, possible runtime issues or misconfiguration, so addressing these warnings increases the quality of your software.
Adhering to a code style helps creating a sense of uniformity and consistency across the codebase. Enforcing the code style solely through self-discipline and code reviews isn’t always efficient, so having tools that can automatically check all the rules that the team agreed upon can save a lot of time. Different technologies have different tools to achieve this, such as CheckStyle, FindBugs, PMD, StyleCop, FxCop and JSLint.
While, introducing these verifications on an already existing project may be daunting since there might be many warnings (both from a compiler perspective or from a styling perspective), doing them is a first important step. Once you know what the existing number of warnings is, you can enforce the rule that no new warnings can be introduced, this will lead to a decrease in the number of warnings over time, especially if your team applies the boy scout rule.
Any Other Verifications/Reports that are Relevant, Depending on the Project?
Each specific project may benefit from additional verifications or reports.
For instance, in a mobile project that we have been working on, we used to do some additional reporting that answered the following questions:
- What is the new size of the .apk/.ipa?
- What permissions/entitlements have been added/removed?
- Are there any Cucumber/Specflow steps that don’t have a step definition counterpart and vice-versa?
- Were there any endpoints added to the APIs that we’re consuming? (by doing a diff between the previous and the current Swagger JSON documentation)
Most of the times, the origins of these verifications are the issues found later on during the development process, such as during manual testing or, even worse, in production. Basically, any manual verification that is tedious and repetitive is a good candidate for automation, either at the check-in level if it is fast, or periodically if it takes longer to run.
Real World Xamarin Use Case
In a Xamarin project that we’ve been working on, we created the following Continuous Integration pipeline.
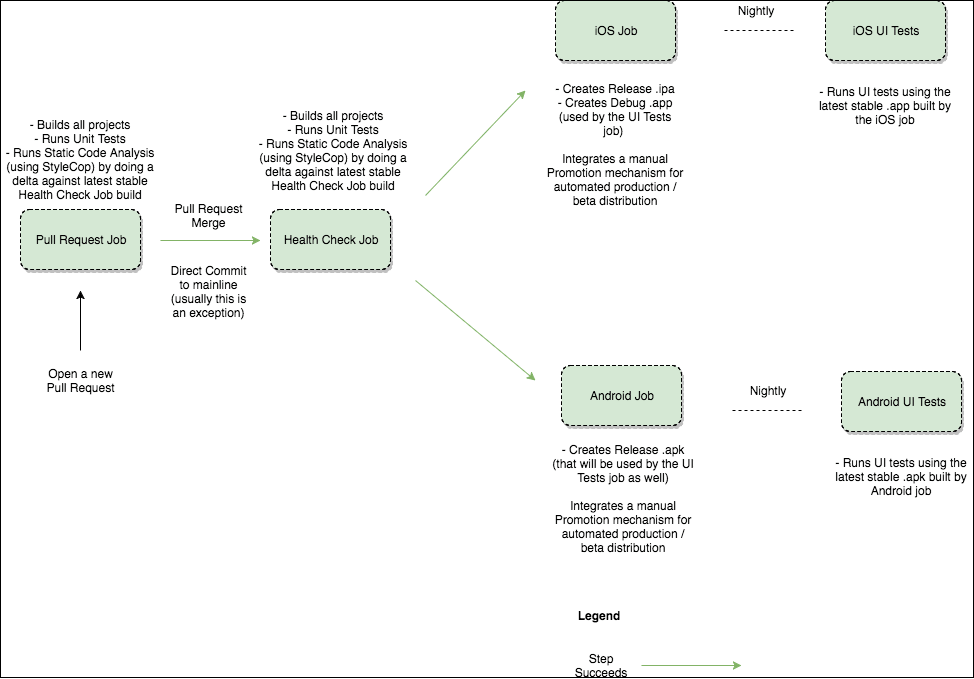 We started with an on-premise Gitlab server for source code management and a Jenkins server that was self-hosted on a Mac Mini on one of the team member’s desk.
The coupling to Jenkins was minimum since we were using Cake Build for our build/test and deployment scripts. Using Cake Build also allowed us to use our existing C# skills to write highly maintainable scripts.
We started the project with a walking skeleton, which means the smallest feature that would give us an understanding of the high-level architecture and help us implement all of our Continuous Integration pipelines.
Since we were using git, small pull requests that had to be code reviewed and pass the Pull Request Job from the diagram above brought in changes to the codebase. We rarely brought changes directly into the master branch, which would have triggered the same verifications via the Health Check Job, which was also run after merging a pull request. The successful Health Check Job would then trigger the iOS and Android jobs that would build the .ipa and the .apk that could later be used for manual testing, automation acceptance testing (nightly) or be automatically promoted/deployed to the respective stores (App Store / Google Play Store) after manual approval.
Any failure in the pipeline would trigger an email notification, making pipeline fixing the team’s top priority.
Later on, during the project’s lifetime, we had the opportunity to move our infrastructure (both source code management and Continuous Integration pipeline) to VSTS. Since our scripts were Cake Build first-class citizens in our codebase and our coupling to Jenkins was minimum, the migration was smooth and predictable. In addition, since our scripts were as self-contained as possible, installing most of their dependencies on their own, we could run them on the pre-configured macOS VSTS Agents with little effort.
Further Reading
Continuous Integration is a core part of the DevOps software engineering culture that allows predictable software development and releases through an increased emphasis on collaboration between development, operations and business, strongly advocating automation and monitoring through all the steps of the software lifecycle.
Here are some resources you can use to deepen your understanding of Continuous Integration and other related practices:
- Puppet State of DevOps White Papers – Provides insight on how DevOps practices (including Continuous Integration) are being adopted across the industry
- Continuous Delivery: Reliable Software Releases through Build, Test, and Deployment Automation – Great resource for understanding CI/CD, infrastructure as code and delivery pipelines
- The Cucumber Book: Behaviour-Driven Development for Testers and Developers – Great resource for writing well-structured automated acceptance tests with Cucumber/Specflow tests (Specflow is just a .NET implementation of Cucumber)
- xUnit Test Patterns: Refactoring Test Code – A comprehensive book on Unit Testing patterns
- The Art of Unit Testing: with examples in C# – Great .NET resource for writing well-designed unit tests
- Mocks Aren’t Stubs – Great article by Martin Fowler that touches on two different unit testing schools of thought – Mockists vs Classicists (we lean more towards a classicist approach whenever it makes sense)
- TDD: Where Did It All Go Wrong? – Great presentation that expands on how TDD and Unit Testing was originally envisioned by Kent Beck
- Xamarin Sample Project – Sample project that highlights the Continuous Integration pipeline for a Xamarin project
About the Author

Cosmin


